© refreshingdentalcare.com
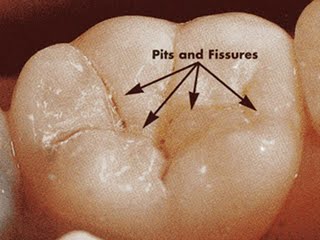
Pits and fissures found on our teeth are obvious stagnation areas where dental plaque can form and mature, which will then lead to dental cavities forming at the entrance to the fissures on teeth. The tooth is most susceptible to plaque stagnation when it first erupts into the mouth because at this time the chewing surface is below the normal line compared to the other teeth and can be easily missed during tooth brushing. Therefore susceptible fissures where good oral hygiene is not established should be protected with a dental tooth sealant.
What are dental sealants?
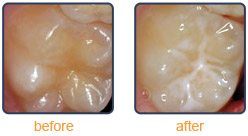
A professionally applied clear or tooth-colored protective coating made of a resin is called a dental sealant (or fissure sealant) and it is similar to that used in some of the tooth-colored fillings. The toothbrush bristles that we normally use are too thick to fit into the grooves or fissures of the teeth, making it hard to clean thus allowing plaque to get trapped and create cavities in teeth, especially the deep grooves on the back teeth. Therefore dental sealants are placed to protect these areas.
When are sealants indicated?
© smilestation.co.in
Sealing of susceptible pits and fissures is carried out as soon as the tooth has erupted into the mouth. The first, second and third permanent molars (back teeth) are obvious candidates, however all molars are not automatically fissure sealed. A dental sealant is not needed when plaque control is good and no cavity is visible. However tooth cavities or missing teeth which have been extracted because of tooth decay in a child’s mouth indicates cavity risk and will favor the use of sealants.
Similarly if a young adult requires fillings on one back tooth, the logical preventive measure is to fissure seal the remaining back teeth.
The shape of the fissures is also relevant. A fissure pattern with shallow rounded grooves is unlikely to decay compared to a deep fissure pattern which is difficult to clean.
When the dentist believes that your diet contains frequent sugar intakes or when poor oral hygiene cannot be improved, for example in those who are mentally or physically disabled, dental sealants should be placed.
Children with significant medical conditions which put them at risk from the consequences of dental disease should be offered dental sealants. These medical conditions include:
- bleeding disorders,
- heart problems,
- poor immunity, and
- metabolic and endocrine problems.
How to use dental sealants to prevent cavities
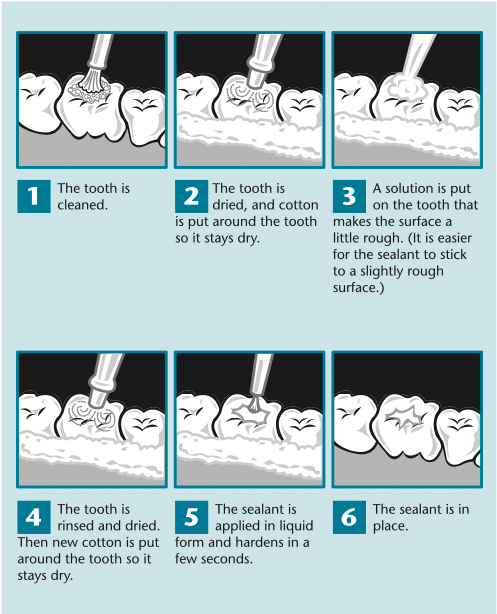
The procedure is similar though less complicated than for white fillings. Placement of the sealants is not time consuming and it is a painless procedure that usually requires no injections and drilling.
© c9.go2dental.com
Isolation of the tooth concerned
The most critical step with regard to the success or failure of dental sealants is isolation. Saliva can block the acid-etched pores on the tooth surface thus weakening the bond to the tooth. Special equipment or lots of cotton rolls may be used to keep saliva away from the tooth. The most effective method is the use of rubber dam to isolate the tooth from its moist surroundings.
Cleaning the surface of the site on the tooth
The tooth surface is cleaned using a bristle brush, pumice and water slurry. The pumice is washed away with water or air and dried thoroughly.
Etching
The etchant is a phosphoric acid liquid or colored gel and it is placed over the whole surface where the pit or fissure is located. No un-etched margins should be ensured to avoid leakage. The tooth surface is usually etched for around 30 seconds.
Washing
The etched surface is initially washed with the water spray from the three-in-one syringe. After 5 seconds, the air button is also pressed for 15 to 20 seconds. In the case of the usage of the gel form, the washing time with air or water is doubled (around more than 30 seconds).
Drying the etched enamel
The drying phase of around 15 seconds is the most important. Moisture on the etched surface stops the resin from entering the enamel pores. The etched area should appear matt and white. The airline has to be ensured to be not contaminated by water or oil by occasionally blowing it at a clean glass surface. If there is saliva contamination re-etching is necessary.
Mixing and applying the resin
Pits and fissures are covered up to the etched slopes on the tooth. A special light source is used to harden the resin. Oxygen prevents the outer layer from polymerizing therefore sealants will always appear to have a greasy film. Fluoride varnish may be applied to the uncovered etched periphery.
Removal of rubber dam and check of occlusion
Occlusion or the bite is checked with an articulating paper. Any high spots are reduced by grinding with a small round diamond stone.
Follow-up dental inspections at regular intervals
Regular dental check-ups are essential to ensure that dental sealants are still fully covering the risk area, otherwise decay may occur. If even part of the protective coat is lost, the tooth will be at risk again.