You are starving. It’s that really annoying sensation down there that drives us all on an eating spree, devouring anything edible. However in your haste of consumption you fail to notice a small but hard piece of bone fragment in your freshly prepared chicken sandwich. You chomp into it. Very hard. There is a moment of silence as a sharp crack vibrates your skull. You spit out what remains of your meal and discover two hard objects; chicken bone and a piece of tooth filling. It’s a Sunday, your family dentist is closed for the weekend. What do you do?
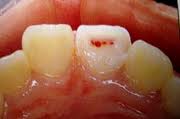
The filling has fallen out, and the pulp is more exposed now.
The very first thing that you should do is evaluate the site of fracture. Take notice of any or a combination of:
1.      Pain
2.      Sensitivity ( to air, cold or hot fluids )
3.      Extent of the fracture
4.      Bleeding
If the deeper portion of the filling is intact (only a superficial portion has chipped off) and that there is no pain, sensitivity or bleeding, there is a high chance that you do not even need to attempt emergency DIY procedures to correct the loss. Just keep the fragment, and make an appointment soonest as possible with your family dentist for him to replace that filling.
However, if you recently had a very deep cavity drilled up and filled up in that tooth, and that entire chunk of filling has come out, there may be pain and sensitivity as thermal stimuli near, because the pulp is more exposed now, due to the removal of the filling which acted as a barrier. Something obviously has to be done in order for you to survive through the days before you reach your dentist.
There have been reports of people using ordinary superglue (cyanoacrylate) to temporarily patch the filling back in place. This is definitely a big NO as ordinary superglue contains a mixture of different cyanoacrylates in which not all of them are suited for medical use.
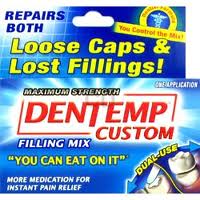
A temporary filling material kit
A quick and sure way to treat this gaping problem is to purchase a temporary filling material kit from a pharmacy. This material is normally Zinc Oxide and Eugenol (ZOE), even dentists themselves use this to temporize cavities that are to be treated on a later date. Â Below are step by step instructions generally on how to temporarily replace your tooth filling. To be more precise, refer to the instructions included inside the kit.
1)Â Â Â Â Â Gently clean the affected area of food debris with a cotton ball or gentle toothbrushing (picture 3).
2)Â Â Â Â Â Wear gloves ( where available )
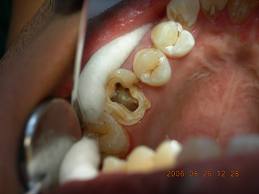
Picture 3: the cavity is cleaned, and cotton rolls are placed at the surrounding area
3)Â Â Â Â Â Dry the cavity as best as you can using a cotton ball, and dry the surrounding areas as well by placing cotton rolls (picture 3).
4)Â Â Â Â Â Should there be pain, gentle application of Eugenol or Oil of Cloves found in the kit would sooth the pain. This liquid can be lightly applied by gentle dabbing with a cotton bud.
5)Â Â Â Â Â Depending on manufacturer, the filling material can come premixed or unmixed.
6)Â Â Â Â Â Roll it up into a ball roughly equal the size of the cavity, ( if unmixed, mix material until it feels doughy, a rule of thumb is that the mixed material that does not stick to your fingers, allowing you to roll it into a ball would be at an adequate consistency)
7)Â Â Â Â Â Put the balled material on the tip of your finger and firmly press it into the cavity.
8)Â Â Â Â Â Remove your finger in a sliding motion against the tooth to prevent the filling from being yanked out.
9)Â Â Â Â Â Gently bite onto the filling ( This will remove any high points that may cause discomfort )
10)Â Â Remove the excess filling material slowly and carefully with the supplied instrument.
11)Â Â Avoid biting or using that tooth until the material has completely set. The time needed for the material to set is also known as the setting time, and it can be found on the instructions.
Zinc Oxide Eugenol fillings degrade over time 2 weeks (but if done professionally, they will last longer) and should be considered the expiry date for such temporary fillings. Therefore, if a dental appointment has not been yet scheduled by that time, it is wise to replace it with a new temporary filling.
Throughout the history, various household items may be used in the same fashion as the instructions above in the event of unavailability of such a temporary tooth filling kit in your region. However, these materials have never been really tested and proven safe, and they can never substitute for ZOE. They are candle wax, dental wax and even sugarless chewing gum.
As stated, these temporary fillings degrade over time, and failure to see a dentist promptly will often result in even more invasive and expensive procedures to correct the damage done. If household items are used instead of ZOE, it is even more important to schedule an urgent dental appointment, and make sure the items are cleaned thoroughly before being placed inside the mouth. Keep this in mind, and hopefully, these tips can help provide some relief and prevent further discomfort.