The following program, when followed nightly, can aid in the prevention of plaque, tooth decay and gum disease.
Dry brushing. The first step is brushing every tooth with a dry toothbrush at the gum crevice, both on the inside and on the outside of teeth. Hold the brush at a 45-degree angle to the teeth and slide the bristles closest to the inside of the upper lip under the gum. Vibrate the brush, making sure the tips of the bristles rotate under the gums (rather like scrubbing the cuticle of a fingernail). Use about ten quick rotations of the brush per tooth, trying not to lift the brush at any point (it’s been found that a person invariably lifts the brush on the same teeth time after time, and those teeth never get the right amount of cleaning). On the inside of the front teeth, hold the brush like a lollipop, parallel to the teeth, and brush with the tip, making sure the bristles slip under the gum. If you want to make sure the bristles get under the gum, bite the brush gently and you’ll force the bristles up.
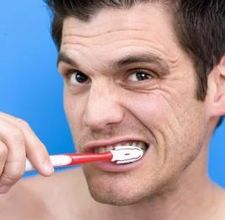
Brushing diligently everyday will remove dental plaque
Brushing. After dry brushing, use your dentist-recommended toothpaste and brush all the teeth surfaces with a circular (scrubbing) motion, inside and out. Make sure to clean the inside of teeth, top and bottom. This can be done by putting the tip of the brush inside and moving it back and forth against the inside of the teeth like a windshield wiper.
Tongue. After rinsing, don’t neglect to clean the tongue. Certain types of bacteria that cause gum-line cavities find the tongue an ideal place to grow. Simply stick out the tongue and brush the surface with your toothbrush from back to front, then rinse well to wash away the residue. Bad breath is often caused by gases released from plaque, and this one step will make your mouth fresher, especially on awakening.
Flossing. Flossing helps clean areas that the brush can’t reach, between the teeth and in the sulcus (the area just under the gum). Use a piece of unwaxed nylon floss about eighteen inches long. Wrap it around the middle finger of each hand so there remains about six inches of floss between them. The index finger and the thumb of each hand are the working fingers, which hold the floss taut, keeping about three quarters of an inch of floss between them. ) If you hold your elbows close to your body, the floss gets between the teeth at the proper angle. )
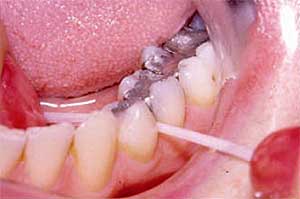
Flossing can clean the area between the teeth
Starting with the upper back teeth, wrap the three quarters of an inch of floss around each tooth in a C shape, so that you clean both between the teeth and onto the inside and outside of the tooth. Next, slide the floss gently past the contact points between the teeth (be careful not to snap it against the gum). Now wrap the floss tightly front to back around the tooth, slip it under the gum crevice, and scrape down. If you haven’t been flossing lately, you’ll notice a whitish substance on the floss—that’s bacterial plaque.
Remember- your gums may feel a little sensitive, but you should have no pain associated with any of these procedures. If you feel actual pain, you are doing it incorrectly and are either cutting or pinching your gums. If you find that your gums bleed when you brush, they will probably also bleed when you floss. Floss each tooth under the gums until the bleeding stops (all the accumulation has been cleaned out). This may not happen in one sitting, but you should have no blood on the floss after a few days. If you don’t have time to do the entire mouth thoroughly, do a quarter of the mouth thoroughly one night, another quarter the next, and so on, and within a week or so the bleeding should have stopped. But be sure to floss at least briefly between and around every tooth every night. Flossing yields immediate rewards. You’ll wake without an unpleasant taste in your mouth if the plaque that caused it has been removed.
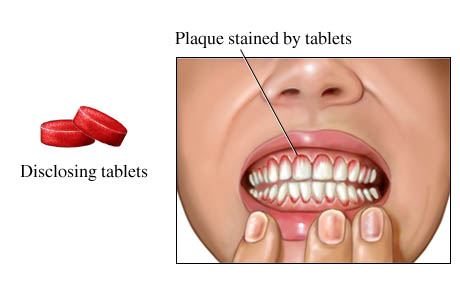
You can check for existing plaque on the teeth by using disclosing tablets
Dentures. If you have a denture, you shouldn’t neglect home care. Plaque forms whether there are teeth or not, and it can affect the gums. Brush the gums! Bad gum conditions can result in expensive dentures becoming ill-fitting and unsatisfactory. And of course, brush and clean your dentures as well.
Bridges. You must clean carefully under and around bridges.. (Your dentist or their assistant can demonstrate the variety of dental aids that help you floss under and around bridges.) After the bridge is cemented, the replacement teeth have to be cleaned with extra care. Dental floss used with a soft plastic threader (available at any drugstore) is essential. This threader slips the floss under the bridge so that you can scrape clean the gum under the replacement tooth or teeth and around the teeth holding the bridge on either side.
Implants. Good home care is both possible and essential with implants. It is slightly more difficult to master and requires careful instruction. Because of its difficulty, many dentists recommend frequent professional cleanings to limit plaque buildup and potential inflammation around the implants.
There is no area of the mouth that you should not be able to clean at home. A lack of coordination or particular conditions in your mouth may make it more difficult, but your dentist or their assistant can offer advice on how to overcome individual problems. Even persons with handicaps will find that they can circumvent many difficulties by using special aids and devices that have been developed.
Disclosing Solution. It’s always a good idea to check yourself to see how well you’ve brushed and flossed. Use the disclosing solution or tablet. Check the directions: you generally rinse with the solution or chew the tablets. If you’ve cleaned your teeth perfectly, the dye will wash right off; if not, it shows up as a color (red, pink, or purple, depending on the product) wherever plaque was left. Brush and/or floss these spots again.